Yes, this year is almost finished, and Santa Claus needs to get his work done. Of course, helped by many volunteers. But sometimes it is a bit too much. Well, Santa Claus is a tough man, I know that for sure, he can handle stress! The other day, however, he came rushing in, terrified, pale around the nose. That was something new for me. He said there was a huge shortage of advent papers, ‘that we need to write several documents and quick! thank you very much!’.
Luckily, the department was just on the verge of writing a piece we were working on. It is all about the Raku language binding to the native libraries of Gnome. It has been done before, examples are GTK::Scintilla and GTK::Simpler of azawi, GTK::Simple of Jonathan Worthington (currently maintained by Richard Hainsworth), and GtkLayerShell of CIAvash.
About Gtk version 4
This department already wrote the Gnome::Gtk3 repository and its dependencies. The modules found in there are all generated from the C source files. However, there was a growing concern that the generator became too complex to handle all kinds of differences showing up in the C source code, and the idea of getting a binding for Gtk version 4 made it even impossible. The other thing was, that the installation of the packages took a long time. So other paths were investigated. To make a long story short, it resulted in the making of Gnome::Gtk4, and a rewrite of all the dependencies. Some packages were removed like Gnome::Cairo, others were added like Gnome::Pango, Gnome::Gsk4 and Gnome::Graphene.
Small appetizer
use Gnome::Gtk4::Window:api<2>;

with Gnome::Gtk4::Window $window .= new-window {
  .set-title('My First Window');
  .show;
}
Simple isn’t it. But it doesn’t do much yet. Besides we will take a jump into the deep and make it a bit more complex by using an ApplicationWindow instead of a Window. First a few pointers: In the first line you see a not-much-used tag, ‘:api<2>‘, added to the module name. This is a necessity to get the proper set of modules on which the Gnome::Gtk4::Window depends. The second detail is the initialization on line 3. The new() calls used in Gnome::Gtk3 and the dependencies are changed to longer names, in this case .new-window().
Now, let’s make a program that does something. The result is the same as the 01-hello-world.raku example from the GTK::Simple package. For us, it was the start of understanding the native bindings and testing the packages. When you compare the programs, you will notice that the code below is more low-level with all the pros and cons.
First, import the needed modules, and notice the ‘:api<2>‘ tags.
use Gnome::Gio::T-ioenums:api<2>;
use Gnome::Gtk4::Button:api<2>;
use Gnome::Gtk4::Grid:api<2>;
use Gnome::Gtk4::Application:api<2>;
use Gnome::Gtk4::ApplicationWindow:api<2>;
Then some conveniences to make names somewhat shorter.
constant Application       = Gnome::Gtk4::Application;
constant ApplicationWindow = Gnome::Gtk4::ApplicationWindow;
constant Button            = Gnome::Gtk4::Button;
constant Grid              = Gnome::Gtk4::Grid;
Announce the class we need to use (HelloWorldApp). Normally the department will write the class in a different file and then import it. Here, for the example, we would like to have the code in one file. After that, we initialize the class using an application ID, a string, which is mostly a reversed domain name. Then, the call .run() will show everything after the user interface is built. It will stay there until a .quit() routine is called, returning a status.
class HelloWorldApp { ... }

with my HelloWorldApp $app .= new(:app-id<org.gtk.example>) {
  my Int $status = .run;
  say "Exit status: $status";
}
Now we’ll write the HelloWorldApp class. First, we will save the Application instance which we will use elsewhere. Notice that it handles the ‘.run()‘ method called from outside.
class HelloWorldApp {
  has Application $!app handles <run>;
The ‘BUILD()’ method initializes the application and sets two signal handlers, one to do work, which is the building of the user interface, and the other to stop the machinery when one of the decoration buttons is pressed on the title bar. The call-back routines, ‘.do-work()’ and ‘.app-shutdown()’ are defined in the class later on (hence the use of self).
  submethod BUILD ( Str :$app-id ) {
    say 'start the works';
    $!app .= new-application(
      $app-id, G_APPLICATION_FLAGS_NONE
    );
    with $!app {
      .register-signal( self, 'do-work', 'activate');
      .register-signal( self, 'app-shutdown', 'shutdown');
    }
  }
In the following method, the user interface is built. We start with creating the buttons. When the buttons are pressed, the routines ‘.b1-press()’ and ‘.b2-press()’ are called. Those methods are also defined in this class. The button ‘$button2' is made so that it does not react when clicked.
  method do-work ( ) {
    with my Button $button2 .= new-with-label('Goodbye') {
      .register-signal( self, 'b2-press', 'clicked');
      .set-sensitive(False);
    }

    with my Button $button1 .= new-with-label(
      'Hello World'
    ) {
      .register-signal(
        self, 'b1-press', 'clicked', :$button2
      );
    }
Then a grid is created with some space around its content and the buttons are added to this grid. Format: ‘.attach( object, x, y, nbr-cols, nbr-rows);‘. So you see, the buttons will appear vertically in a column.
    with my Grid $grid .= new-grid {
      .set-margin-top(30);
      .set-margin-bottom(30);
      .set-margin-start(30);
      .set-margin-end(30);

      .attach( $button1, 0, 0, 1, 1);
      .attach( $button2, 0, 1, 1, 1);
    }
Finally, we add the application window in which we insert the grid.
     my ApplicationWindow $win .=
       new-applicationwindow($!app);
     with $win {
      .set-title('Two Buttons');
      .set-child($grid);
      .show;
    }
  }
The rest of the methods are needed to handle the button’s click events and to stop the application. Note the use of ‘Button()’ as opposed to ‘Button‘. This is because the named argument, ‘:$_native-object‘ is, as the name suggests, a native object that must coerce into a Raku class Button. The named argument ‘:$button2’ is provided because we gave it in the call to ‘.register-signal( self, 'b1-press', 'clicked', :$button2);‘ for $button1 above.
  method b1-press (
    Button() :_native-object($button1), Button :$button2
  ) {
    say 'button1 pressed';
    $button2.set-sensitive(True);
    $button1.set-sensitive(False);
  }

  method b2-press ( ) {
    say 'button2 pressed';
    $!app.quit;
  }

  method stopit ( ) {
    say 'close request';
    $!app.quit;
  }
}
Then the only thing left is running it…
Taraaaa!
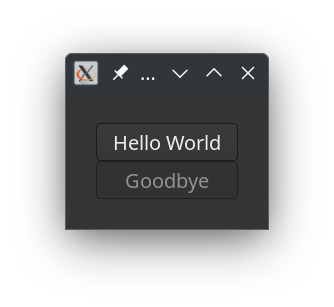
A window shows up with two buttons1. The lower one is not sensitive. When you click on the ‘Hello World’ button, you will see the ‘Goodbye’ button becoming responsive and the ‘Hello World’ button becomes insensitive. The application will exit when either the ‘X’ button in the top right corner of the window2 is clicked or the ‘Goodbye’ button is pressed.
So then, this is a nice document for Santa Claus, he will be happy and hopefully, you will be too.
You can find the Gnome::Gtk4:API<2> reference documents here.
To install the distributions, you only need to install the Gtk4 distribution like so, (note the quotes to prevent the shell redirect action);
zef install ‘Gnome::Gtk4:api<2>’
Of course, you must take care of the native libraries that must be installed. Unfortunately, we have no experience with operating systems other than Linux-based Unix.

2 thoughts on “Day 9 – The end of the year”