
Today’s story is about my naiveness and terminals.
The original task is simple. Show the output of some program in a sub frame of a TUI application. (TUI == Text User Interface, i.e. apps like tmux, vim, k9s)
For those that wonder, there is a yet to be finished TUI debugger application I’m working on, the child program is the thing to debug, the TUI debugger should put the child’s output in a frame.
So without knowing what I was getting into, I tried the obvious and retrieved the program output via Proc::Async. This looks something like this:
my Proc::Async $proc .= new: 'raku';
my Supply $receive = $proc.stdout(:bin);
$receive.tap: -> $v {
    # Write program output somewhere on my screen.
    say $v;
};
But when doing the above, the usual thing that happens, is that one receives no output. This is because of output buffering. Most programming languages, including Raku automatically detect whether the output goes to a display or some other place. Whenever the output does not go to a display, it’s buffered, i.e. not written immediately, but in larger chunks for better performance. Sometimes it’s possible to turn off output buffering on the client side. In Raku this is done with:
$*OUT.out-buffer = False;
But oftentimes we can’t modify the child. So this is not a general solution. A better idea would be to somehow tell the child that the output is a display, while in reality we are intercepting it. Then we’ll receive the output just like a display would. This is indeed possible. But since program input and output are things that happen on the operating system side, this requires support by the OS. The name for that feature is Pseudo Terminal or PTY for short. In recent years even Microsoft Windows gained support for it. In general the idea is to request such a PTY from the OS and then start the child with that PTY attached to the in and out pipes. (Side note: In contrast to the standard process pipes, terminals and in extension pseudo terminals do not distinguish between standard out and standard error.)
But (this is the third paragraph starting with a “But”) Rakudo does not provide support for starting a process with a pseudo terminal attached. My initial idea was to create a Raku module to create a PTY and connect that to the pipes via Proc::Async.
But (that’s the next one) that turned out to be impossible, as on Windows, PTYs are coupled to process creation. Process and PTY can only be created together. So it’s impossible to do as a module. The next escalation step is implementing PTY support in MoarVM. That’s what I actually started doing. I managed to make it work just fine on Unix. Since PTY and process creation are coupled on Windows, it’s not possible to utilize the process creation machinery of the platform abstraction C library MoarVM uses – libuv. We have to do process creation ourself to utilize a PTY.
But (really?!) looking at how libuv creates processes on Windows, I noticed that this involves many hundred lines of code to get process creation right. I absolutely oppose copying over hundreds of lines of code from libuv just for the PTY special case on Windows.
The Solution
So the final (finally!) solution is to add PTY support to libuv itself. The work on this is mostly finished, the PR is up and went through a few rounds of review.
Until that PR is merged we now use a temporary fork libuv in MoarVM. Two PRs, one in MoarVM, one in Rakudo, later, it’s finally possible to create processes with a PTY in front with Rakudo. All of this was released in Rakudo 2025.12 yesterday.
But (what?!?) just putting a process behind a PTY is not enough to allow robust embedding of the process’ output in a frame. To understand the issue we have to learn a bit about computer history.
Background
There is a partly standardized, partly shaped by convention, protocol of how applications can command the terminal to do interesting things. Terminals are hardware devices consisting of a keyboard, a monitor and some state handling logic. These devices were the normal way to use computers a few decades ago.
Such a terminal is wired up to a computer via a serial cable. One wire for input (the keyboard) and one wire for output (the display). These devices fundamentally receive bytes representing characters on the wire and put those on the screen. They keep a history of lines allowing scroll back, have two screen buffers to allow saving and restoring screen content (e.g. to restore the screens content after a vim or tmux or less session), and introduce a pretty large set of special commands to make the terminal do all sorts of interesting things.
These special commands are sequences of characters mixed into the output. To give an example: ESC[1mHelloESC[m world! (With ESC being the actual escape byte – 0x1B) will print “Hello world!” on the screen. Some were introduced (in many iterations) by the original hardware terminals, some were added later. Some examples of features some of these original terminals featured:
- Putting the cursor some place on the screen.
- Scrolling up and down to see the history.
- Erasing parts of the screen.
- Changing the color of the background cells and characters to be written.
- A speaker that can beep.
VT100
These terminals always represented the screen as a grid of character cells of a fixed width. The arguably most influential of these terminals was the VT100.
Many of today’s terminal emulators are compatible with what a VT100 could do. But they usually sport many additional, sometimes obscure, features, e.g. colored text (very common) or drawing pictures (kinda obscure).
These special commands are standardized. That’s the ANSI Escape Codes.
So when we don’t pay attention to all this and trying to embed the output of some program that puts any of these escape codes in its output it will quickly mess up our terminal. Just imagine the child frame’s top left corner to be at row 15, column 40 and the child moving the cursor to row 5, column 32 and then writing some text. That text will happily be written outside of its frame.
Emulating
What we’ll have to do is creating a virtual representation of a terminal and applying the output of the child process to this virtual terminal. This includes implementing a parser that can detect escape codes in the stream of output text and providing implementations for many of them. The screen of that virtual terminal can then be copied into the frame we want the output of the child to appear.
Every current day’s Terminal Emulator is – as the name suggests – doing just that, it emulates in software a terminal device including the screen grid, history and many of the escape codes.
So to finally be able to embed the child program’s output in a frame of the debugger I’m working on, I had to write a terminal emulator! Luckily there already is a module – Terminal::ANSIParser in the ecosystem for extracting escape codes from a stream of text (which is a pretty complex task all by itself, requiring a mid sized state machine that you have to get just right). Thanks go to Geoffrey Broadwell (japhb) for this module! So that’s at least one part of the task out of the way.
Anolis
The module that fell out of the effort is named Anolis in reference to the color-changing lizards. It’s a pure Raku terminal emulation library.
Using it is pretty simple:
use Anolis::Interface;
use Anolis;

class Interface does Anolis::Interface {
    method heading-changed(Str $heading) {}
    method log(Str $text) {}
    method grid-changed(@changed-areas) {
        # Do stuff with the changes.
        # Or access $anolis.screen.grid to read from the virtual screen.

    }
}

my Proc::Async $proc .= new: :pty(:rows(32), :cols(72)), 'bash';
my Interface $interface .= new;
my $anolis = Anolis.new: :$proc-async, :$interface;

$anolis.send-text('ls\n');
To use Anolis you need to provide an implementation of Anolis::Interface. Via that interface you’ll be notified whenever the screen contents change. In the simplest form one can just copy the entire screen contents over to wherever one wants the content to appear whenever it changes.
The implementation is far from complete, but enough escape codes are implemented to get bash and vim running.
In the Terminal-Widgets-Plugins-Anolis distro I’ve implemented a minimal integration of Anolis and Terminal-Widgets, a pretty epic TUI widget toolkit (also by japhb++). I’ve created a small script that demonstrates Anolis and the Terminal-Widgets integration. That same script is also pretty helpful in implementing further escape codes.
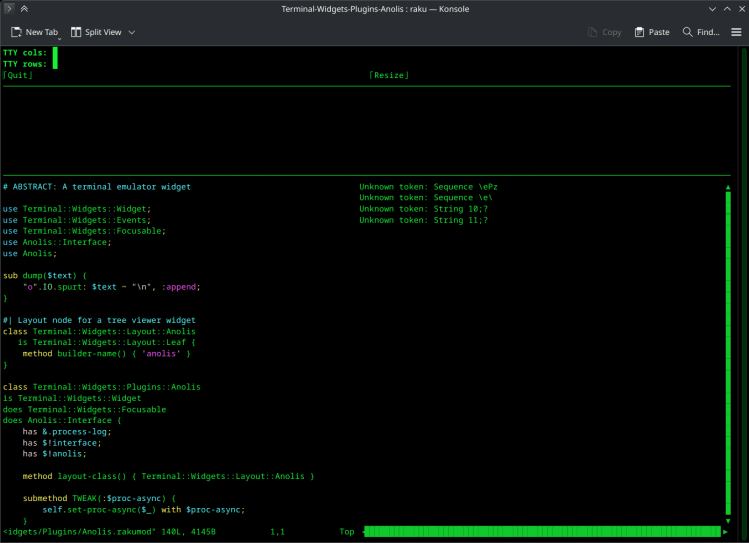
On the left it shows a frame with the client screen, on the right a log of unknown escape codes. So the process is usually as simple as running that script, interacting with the child and whenever a log entry shows up, implement the escape code that is reported as unknown.
I’ll conclude with a list of resources on escape codes:
Have a merry Christmas Time!

One thought on “Day 21 – A Terminal’s Tale”